Saturday, July 27, 2013

Studio Calico card kit...

Hi there! Just popping in to share my Studio Calico cards with this month's kit, Marks & Co. The first card kind of happened as a happy accident. No pun intended! I cut out the "joy" with my Cameo and took out the "joy". While I was trying to decide if I should use the negative or the positive of the image on my card, I noticed that they looked cute together like this...placing the positive right below the negative for a shadow effect. Then I layered some of the patterned paper (the index sheet of the 6x6" paper pad) under the negative.

Another problem I had was that the "joy" ripped a little bit when the Cameo was cutting it out. See the gray scalloped circle? It's hiding the rip. :) Don't throw your card away when you have a mistake, just disguise it! The pink butterflies are stamped from the stamps in the kit, and I had to add the pretty teal butterfly and enamel dots from the kit too. (Made with main card kit only.)

On the second card, I found that the circle stamp in the kit worked perfectly with my Martha Stewart scalloped circle punch! These punched circles fit right inside the stamp. So I had fun mixing teal, gray and yellow patterned paper with stamping around them and added the clear yellow butterflies.


(Made with main card kit only, no other kits.) I cut a little branch with my Cameo and added stitching. Actually the butterflies are stitched right onto my card too, so they don't come off.

The Happy Heart card below is a mix of the main card kit and a little bit of the Project Life Add-On. (Heart, happy, clip and aqua frames are from the PL add-on.)
I used a die from Papertrey Ink to cut the chevrons (Chevron Cover Plate) and added the gray polka dot paper behind. I bet you can tell that the gray paper was my favorite!

This one is made with the main card kit only. I stamped the butterflies in red, hot pink, light pink and yellow and then added a couple of dimensional ones over top in matching colors. I stitched them on. It felt too tall and skinny to me, so I broke out an older border punch and added some pretty sides. :)

The "For You" was stamped in Summer Sunrise ink ("for you" stamp is in the kit also).

Full reveal of the kits is tonight at midnight EST at www.studiocalico.com.

Wednesday, July 24, 2013

cut it out...

All this week on the Pink Paislee blog, we are showing you ways to use Pink Paislee's cut files. I chose to use the Word Jumble1 and used my Cameo to cut it out.

I used the She Art - Vintage Lace Mask by Pink Paislee to create some depth on the edges with dimensional paste.


Some Heidi Swapp Color Shine mist was brushed under the title work and journaling to add color and help it stand out. I mixed a little bit of the Cottage Farms, Secret Crush and She Art lines. Love the dimension created with all of the layers.


Stop over to the Pink Paislee blog to read more about how to create this page!


Tuesday, July 23, 2013

Studio Calico's Storytime...

Studio Calico is revealing their new lines, so I can share a couple of cards made with their new Storytime line for CHA...a girl card and a baby boy card...
On the girl card, I cut some large butterflies from the text paper and layered them. The dies are the Beautiful Butterflies dies by Papertrey Ink. They are layered over the soft pink graph paper and a pretty floral journaling card! I added a bit of ribbon, a pin and some stitching. I love these new flair pieces that match the line! And the pearls!

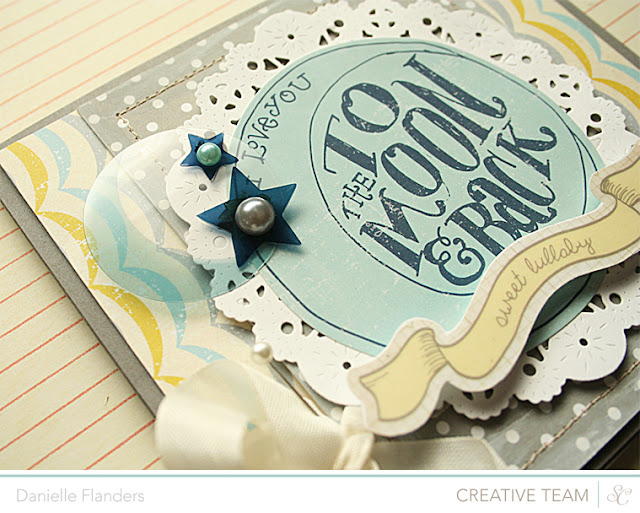
Next, a baby boy card... love the papers from this line. I used the soft gray dot and the pretty scallops. I wanted to highlight the big "to the moon and back" sticker, so I cut out a Parisian Lace doily with a die and backed the sticker with it.
Here you can see these cute acrylic shapes - the moon and stars! A-dorable! I used a clear sticker (sweet lullaby) and just backed it with white cardstock, so it shows up a bit better. New pearls to match the line will be available too!

You won't want to miss all of the gorgeous projects by the team. HERE is a link to the new Storytime collection (projects), HERE is the new Thataway line and HERE is the new Magical line. :)

Monday, July 22, 2013

Studio Calico August card kit sneaks...

Would you like to see a few peeks of the next card kit at Studio Calico? I really liked the colors this time! This one is made with the "main card kit" only...utilizing the stamps, pretty butterflies and patterned papers.
Another "main card kit only" card with the stamps again and did some cutting with my Cameo...

This one is made with the main card kit and a little bit of the "Project Life add-on".

I'll have more for you soon! The kits will be available in just a few more days.


Saturday, July 20, 2013

holiday cards in July...

The Craft and Hobby Show is coming up in just a few days! What are your favorite new lines that you've seen so far? I have a few more cards to share with you made with Pink Paislee's new Snow Village line. HERE is a sneak peek of the whole line.

The first one uses the Snow Village stamps. I fell in love with the elegant look of the "Christmas" stamp and used it with Fresh Snow ink and white embossing powder on white cardstock.  The Snow Village Ephemera package has a ton of die cuts in the package and even some gorgeous vellum pieces as well, which is what I used here with a chipboard poinsettia over the top.
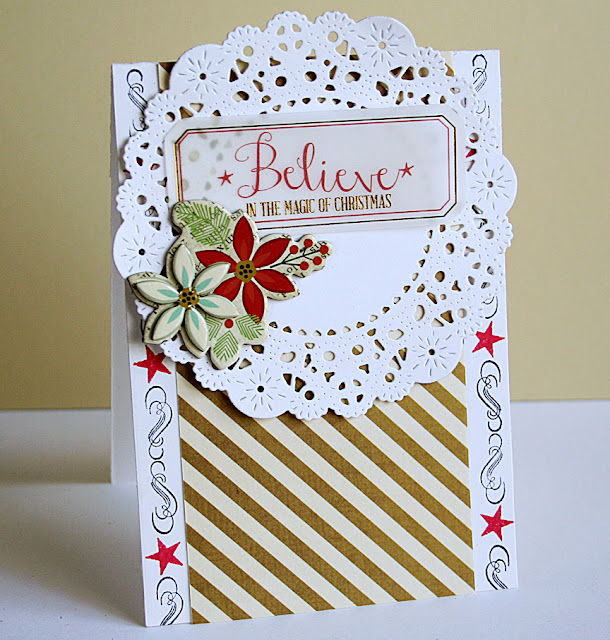
On the Believe card, I stamped the sides of the card with the Snow Village stamp set. I cut a doily out of white cardstock with the Parisian Lace Doily die by Papertrey Ink, then added a vellum Ephemera piece and a chipboard piece. Really simple card to make, even though it looks more involved.

I love these layered chipboard pieces from Snow Village!

On the third card, I chose an Ephemera piece - a golden reindeer -to be the highlight of this card. He's shiny in real life. I used a vellum frame from the line over a journaling card (from one of the 12x12" papers) and stamped "Christmas" on it.

The last card was a little more involved. I began by stamping Christmas on white cardstock at an angle for the background in black. I wanted to add more items over the top, but didn't want it to be too busy looking, so I added a sheet of vellum over the stamping. It tones the look down, but you can still see the saying peeking through.
I framed out the stamping with 2 pieces of patterned paper, one on top and one on bottom. Last, I added some Ephemera pieces and a chipboard flower on top. I love to layer to create more interest!

Always feels weird making holiday cards in July, doesn't it? I suppose it's better to get a head start than to wait until December. Enjoy your weekend. We are getting new windows put into our home this coming week, so our job this weekend is to move all furniture away from windows and take down all blinds and curtains. Sounds like fun, huh. But I'll be glad when it's done. :) Thanks for swinging by. Hugs,


Friday, July 19, 2013

Scrap your holiday photo...

Good morning! If you are looking for the SC Toolbox blog hop, see below. I thought I'd pop in and share a layout made for CHA with Pink Paislee's Snow Village line. I loved working with this line, the colors are earthy and beautiful together, and the patterns could be used for any occasion, not just holiday. That makes these papers so versatile.

I scrapped our holiday photo from last year, which was kind of an impromptu photo! My parents were visiting and we decided to go for a walk around the neighborhood one morning. My mom snapped some pics of us. (If I would have known, I would have dressed the girls better. Hee) But I ended up using it as my holiday photo anyway. Rarely do we get pics of the 4 of us!
When I first opened the packages of everything, I was inspired by the stamps. They are adorable! I couldn't wait to use the "christmas" stamp. I cut up the 12x12" paper with the journaling cards on it and laid them on my layout, then made a card with the "chalkboard" look with the stamps to go with these! Check out the vellum borders too, they are so cute. Here you can also see a peek of the Ephemera and chipboard.

I pulled out my Cameo and cut the big "joy" out to add some pizazz and drama to the page. Last, some punched circles and snowflakes tie it all together. Oh, see the red under the photo? That is a journaling card also from one of the 12x12" papers. I used it to add color and tucked it under the photo, which will draw your eye down to the photo and frame it out a bit. The black stripe is simply cut from one of my Heidi Swapp alpha packages. I needed a tiny bit more black in the corners of the page.

I think I will come back tomorrow and share a few cards. Thanks for reading! If you'd like to see the Pink Paislee summer catalog and all of the new products, CLICK HERE.


Put your tools to work for you...

Want to learn more about the tools in your crafty arsenal? 

Check out Studio Calico's TOOLBOX class! This class will show you cool tips on stitching, mixed media, misting and digital from four technique masters. Amy Tan, Celine Navarro, Geralyn Sy and Shanna Noel will each spend a week in August teaching you the ins and outs of their favorite techniques. I'll be contributing to the misting week, and I'm going to be sharing a card showcasing a beautiful technique using glue and mists!

Through 7/24, Studio Calico has a cool offer for everyone who signs up for Toolbox! They'll be able to pass a FREE spot in the class to a friend. 

Check out some of the sneaks and classroom files you get HERE. Super cute! You'll want to stop by Geralyn Sy's blog for a chance to win a spot in the class, and then pop over to the Studio Calico blog for more links to class sneaks and giveaways. See you in class!


Monday, July 15, 2013

release day...

The Papertrey Ink team is back to you what other products are new this month! They will be released tonight at 10 p.m. EST. First up, I used the Wonderful Words: Together stamp set and dies. I have been loving the "cutting your own titles" trend in scrapbooking lately and wanted to show that these Wonderful Words dies work amazing for layouts!


I cut a bunch of together's out and even used the negative cut outs on this 8 x 8" layout. The Harvest Gold one is stamped. "We are in this..." is also part of the stamp set! My husband has been trying to teach  my 8 year old how to ride her bike. She hasn't been interested thus far, but we now that we have bike trails right behind our house, we are all itching for her to learn, so we can go together...all 4 of us!


We are in this together layout:
STAMPS: Wonderful Words: Together
INK: Harvest Gold, True Black ink
PAPER: Rustic White

DIES: Wonderful Words: Together die
OTHER: Artisan paper by Pink Paislee colored with Gelatos, arrow by Studio Calico.
-------


On the Thank You card, I used the new Bitty Background Blocks II and alternated the position of it with Dark Chocolate ink to create a background on a slant. The flower and leaves are from Delightful Dahlia Additions and the flags are from First Place.


Thank You From the Bottom of My Heart card:
STAMPS: Delightful Dahlia Additions, First Place, Bitty Background Blocks II
INK: Dark Chocolate, True Black, Soft Stone, Classic Kraft, Sweet Blush, Hibiscus Burst, Pure Poppy inks
PAPER: Rustic Cream, Soft Stone, Classic Kraft

DIES: Delightful Dahlia Additions
OTHER: none.
-------


"May All Your Wishes Come True" is made with the new Wishes Come True stamps and the First Place dies, as well as the By the Numbers Border die (5) and Suffix Style dies. (th)
I wanted the 5th circle to be the focal point, so I kept the candles simple and stamped them in Soft Stone ink with Harvest Gold flames randomly - I wasn't trying to get them straight, I wanted the card to fun and random. The stars on the red paper were stamped with Bitty Background Blocks II.


5th card:
STAMPS: Wishes Come True, First Place, Bitty Background Blocks II
INK: Summer Sunrise, True Black, Harvest Gold, Soft Stone
PAPER: White, Aqua Mist

DIES: First Place, By the Numbers Border, Suffix Style
OTHER: Twine.
-------


When I first saw the First Place stamps and dies, I was picturing a ribbon hanging on a bulletin board. To create the frame, I trimmed out pieces of kraft cardstock and angled them in the corners. I inked the edges to create more dimension on the strips, then placed them over the edges of the card to create a  "wooden frame" look for my bulletin board.


I made little extra "ribbons" to hang under the circle by trimming out some strips of cardstock with pinking shears.
You're the Best card:
STAMPS: First Place
INK: Sweet Blush, Pure Poppy, True Black, Vintage Cream inks
PAPER: Classic Kraft, Sweet Blush, White, Aqua Mist cardstock

DIES: First Place
OTHER: pinking shears, star pin by Maya Road.
-------


Next is Boutique Borders: Love. I cut the frame out with the Boutique Borders: Love die and stamped it in black and then used Dark Chocolate for the sentiment. I rubbed my Vintage Cream ink pad over the top to soften the look. A banner finishes off the card with punched hearts.


I ran out of Papertrey Ink's rustic twine, so I used some pink twine from my stash from The Twinery. See the brown striped heart? That was stamped with Bitty Background Blocks II in Dark Chocolate. The other ones are cut from cardstock and patterned paper.
Love You card:
STAMPS: Boutique Borders: Love, Bitty Background Blocks II
INK: True Black, Chocolate Brown, Vintage Cream inks
PAPER: Sweet Blush, Rustic Cream, White cardstock, Aqua Mist Pattern Pack, Sweet Blush Pattern Pack


DIES: Boutique Borders: Love die
OTHER: Melissa Frances pearls, The Twinery twine, American Crafts stripe paper, Spring Mix , dark yellow paper by Studio Calico, buttons.
-------


Here I used the Mat Stack 6 stamps and dies (frame) and the tree/leaves/flowers from the new Polkadot Parade #6. I used a big leaf from Meadow Greens to create a soft gray background.

You are an Amazing Friend card:
STAMPS: Polkadot Parade #6, Mat Stack 6, Meadow Greens (big leaf in background)
INK: Pure Poppy, Ripe Avocado, New Leaf, Summer Sunrise, True Black
PAPER: Smokey Shadow, Soft Stone, white cardstock and Sweet Blush Pattern Pack

DIES: Mat Stack 6 dies, Polkadot Parade #6 dies
OTHER: gems.
-------


Last is Summer Hills. I trimmed out a little house from the stamp set, colored it in with colored pencils and added it to a journaling card by Pink Paislee from their Hope Chest line. The sentiment is stamped with Summer Hills also.

You're Always in My Heart card:
STAMPS: Summer Hills
INK: Classic Kraft, True Black
PAPER: Rustic Cream, Aqua Mist

DIES: none
OTHER: heart punch by McGill, pearl by Melissa Frances, pinking shears, Aqua Mist ribbon, colored pencils.
-------


That's it for me! For more ideas, visit the other team members to see what they've made with these same sets. All of these products will be available on July 15th at 10pm EST at www.papertreyink.com.

Betsy Veldman
Nichole Heady